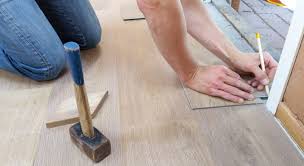
Laminate Installation Tips
Step By Step Instructions:
Preparation
48 hours before installation place the
flooring in the room to be installed and horizontally score the unopened
packages. Once packages are open, planks should be installed immediately. Check
all planks to be installed. Claims for defective planks that have been installed
cannot be considered.
Installation
Planks can be installed over concrete,
vinyl, linoleum, wood, ceramic tile, marble or stone. Existing carpet should be
removed.
- Clean the sub floor and make sure that it is level and dry. The sub floor cannot vary more than 3/16″ in 8′; moisture content of the wood sub floor should be no more than 10%, with a maximum of 5 lbs. vapor emissions for concrete sub floors.
- Concrete sub floors must be covered with 6 mil polyethylene film. New concrete must be cured for at least 6 weeks before installation. Existing concrete with flooring already installed such as vinyl or ceramic must be covered with 6 mil polyethylene film. Overlap seams by 8″. Seams do not have to be taped.
- Do not use polyethylene film over wood sub floors.
- Remove all existing trims and wall base as necessary.
- To ensure that your first and last row of planks is of equal width, measure the width of the room and divide the width of the room by the width of the plank. If the width of the last row of planks will be less than 21/2″ cut the first row of planks to make it narrower to achieve an approximate equal width in the first and last rows.
- If possible, install planks with the long direction parallel to the incoming sunlight source or to the longest wall of the room.
- Leave a minimum 1/8″ expansion area around walls and obstacles in the floor.
- Begin installation at the left-hand corner. Place the first plank with the tongue side towards the wall, being sure to allow 1/8″ for expansion. We recommend cutting off the tongue on this first row to avoid any problem with the expansion gap. Insert the second plank into the first at an angle pressing the short ends together; then press it down. Repeat the same procedure down the row. Measure and cut the last plank of the row (decorative side up if using a hand saw, decorative side down if using and electric saw). Set the remaining piece aside.
- To start the second row, use the piece left over from the last plank of the first row. If it is too short, cut a new plank in half and use one half to start the second row. Insert the first plank of the second row at an angle into the first row; press in and down at the same time until the plank locks in place. Repeat this step with the next piece, keeping the short joints of these two pieces as close to each other as possible without actually engaging them. Using a tapping block, tap the second piece into the first. Continue installation in this manner. From the second row onward use a pull bar to engage the short edge of the last plank.
My Laminate Flooring Won’t
Lock
A Few Possible Problems
Some common reasons why laminate pieces
won’t snap into each other include:
- A warped or flawed piece of laminate
- A heaved or uneven subfloor
- A piece of debris trapped under the flooring or underlayment, or in the flooring’s grooves
- A protruding nail or screw head
To troubleshoot, start by holding the plank
up at eye level to see if it is warped. If not, examine it for manufacturing
flaws or debris in the grooves. If there’s debris you can brush it out, or if
there’s a defect you can trim the plank to remove the affected section.
If the problem isn’t with the plank itself,
problem, look at the floor underneath your work area. If nails or screw heads
prove to be the culprit, lift the underlay and drive them all so they’re flush
or countersunk. If there’s debris beneath the underlayment, pick it up manually
or sweep it up before replacing the underlayment.

Tongue or Groove? Which to
Install First
Which side is the tongue, which the groove,
and which goes first during installation?The tongue is the side that you will
want to place against the wall as you start your laminate-flooring
installation. If you mix the two up and start with the groove side, you will
have difficulty completing the installation because you will essentially be
installing the flooring backwards.In the line drawing above, note the
orientation for the tongue and the groove. As this illustration indicates, the
tongue for any Swiss Krono click system protrudes outward, while the groove
part forms a cavity for the tongue of the next plank to fit into. Both are cut
to micron precision so that they create a snug, interlocking installation.You
will want to start in the left side of the wall you pick with the tongue on the
long side of a plank facing the wall. The tongue against the wall should be
removed. You can use a sharp utility knife for the 7-mm or 8-mm product, but
10-mm or 12-mm product will require a saw.It is important to work from left to
right to avoid damaging the tongues on the short side of the boards.Before
getting started with your installation project, and after you have acclimated
your laminate flooring planks, it’s a good idea to get all of your planks
oriented in the same direction with the tongue side of each plank parallel to
the wall you will be installing against.
How can I fix open joints in
my laminate flooring?
Humidity can make your laminate floor
boards shrink or expand a bit. This fluctuation in humidity levels can cause
them to click loose and move, resulting in openings between the boards.
Fortunately, you don’t have to remove the entire floor to close these open
joints. Using the following step-by-step guide, you can easily fix the problem.
Before you get started, you’ll need a few
tools: a hammer, a chisel, a crowbar and a tapping block. Optional: wood glue.
- Take a close look at the open joint and try to determine in which direction the board moved. This is the side where you’ll remove the skirting board.
- Use the chisel and hammer to remove the skirting board on the side the laminate board moved towards.
- Once you’ve removed the baseboard, you’ll see which board came undone. Using the hammer and tapping block, knock the board back in place to close the open juncture. You can use some wood glue in the crack between both boards to make sure it won’t come apart again.
- Glue your skirting board back together and your laminate floor is perfect again.
The Best Way to Cut Laminate
Flooring – Step by Step
This quick guide covers all the laminate
flooring cuts you’ll need to make. If it seems quite easy, be sure that it is
with a little practice. You may make a false cut or two, but those pieces can
be salvaged for later when a shorter piece is required.
Cutting laminate to length:
- Measure the length required using your tape measure
- Mark the board for the cut
- Use your square and pen or pencil to create a straight line across the face of the board
- Use your cutting tool to make the cut on the waste-side of the line, and use a damp cloth to remove any remaining ink
Cutting laminate to width:
Cutting to width is required for the last
board to install before an obstacle such as a wall, cabinetry or fireplace.
Keep in mind that laminate flooring requires an expansion space of about 1/4″
to keep the flooring from buckling when it swells slightly with warmth and
humidity. The gap will be covered by the baseboard.
- Lay a full piece of laminate on top of the second-to-last piece, snug it against the wall, and measure the amount of overlap
- Cut a guide out of laminate scrap that is as wide as the overlap plus 1/4″ to mark how much of the laminate must be removed
- With the piece still against the wall, place the guide you’ve made on top of it, also against the wall
- Run the guide down the length of the board, holding your pen at the base of the outside of it to mark the last piece for cutting
- Cut the piece on the waste side of the line, and use a damp cloth to remove any remaining ink
Cutting laminate around pipes and other
obstacles:
- For pipes, measure the length and width to the center of the pipe
- Make a mark on the laminate piece where the center of the piece would be
- Use a hole saw about 1/2″ in diameter larger than the pipe diameter to create an opening for the pipe
- Cut the laminate piece in half across its width through the center of the hole
- Fit the pieces around the pipe, and use glue suitable for laminate to attach the pieces together
- For cutting around odd-shaped obstacles, use the profile gauge to replicate the profile of the obstacle
- Lay the profile gauge onto the piece of laminate, and trace the profile onto it with your pen
- Use the jigsaw to cut out the profile, cutting on the waste side of the line