Which Carpet Flooring Is The Best For The Kitchen

Best Timeline On Proper Carpets Cleaning Care

Your home carpet is probably the largest décor item in your living space, as such its condition has the biggest impact on the appearance of your interior. Naturally, you would want to keep it looking pristine and free of dust, odor and other forms of allergens. In addition, your carpet is a considerable investment, so you want to make sure it lasts as long as possible.

If you want to keep your carpet looking clean and performing at its best, you need to maintain a regular cleaning schedule. Having your carpet professionally deep-cleaned is a perfect way to get rid of particles of dirt, dust, residues and allergens that accumulate on/in your carpet over time.

But how often should you clean your carpet? Well, this varies depending on a number of factors.  Some homes will need carpet cleaning every 3 to 6 months, some 6 to 12 months and yet others will only need professional deep cleaning every 12 to 18 months. So if you’re wondering how often you should have your carpets professionally cleaned, here are some factors to consider.

If you do regular vacuuming

Regular vacuuming –about once per week –will increase your carpet’s durability. Vacuuming removes particles that settle loosely on the surface of your carpet before they settle deeper and start abrading the carpet fibers. Regular vacuuming can allow you to go longer before needing professional cleaning.

However, no matter how often you vacuum, you will still need professional deep carpet cleaning sooner or later. So if it’s been long since you hired a professional to clean your carpet, now is probably the best time to do so.

If someone in your household has allergies

In many ways, your home carpet acts as a filter, so it ends up collecting allergens and dust that float around your living space. Over time, the dust and allergens built-up in your carpet fibers and will become airborne again anytime someone walks across the carpet. So if your household has someone with allergies, you will need regular professional carpet cleaning to restore a healthy living environment and minimize the reaction symptoms–every 4 to 6 months should do.

If You Allow Pets on the Carpet

If your home has pets, you already probably know that regular cleaning is a wise move. Other than bringing dirt from outside, pets can also distribute feces, vomit or urine on your carpet. Even the best-trained pets can occasionally make a mess. Sooner or later, your carpet will start showing unsightly stains and producing unbearable odors. Thankfully, frequent carpet cleaning will help neutralize the odor and get rid of the stains.

Do You Have Children?

Kids are cute, and we all love them, but to be honest, they can make quite a mess on your carpet. How often you should clean your carpet when you have kids all depends on how strict you’re when it comes to allowing them to take food and beverages on the carpet. Additionally, according to Service Master Carpet Cleaning, if you allow your kids to wear shoes or color and paint in the house, you might need to have your carpet professionally cleaned every after 6 months.

What color is your carpet?

If you have a light-colored carpet, you probably already know how notorious they’re at revealing stains and dirt. Keeping your bright-colored carpet looking clean will require more frequent cleaning than does their darker counterparts. You, however, don’t have to necessarily avoid dark light-colored carpets, after all, they’re really great at brightening up living spaces and revealing an increasing level of dirt before it really builds up.

Do you allow shoes on your carpet?

Shoes bring in dirt and small particle of grit that can cause your carpet fibers to wear much faster. The more people you have in your home, the more traffic and dirt your carpet will have to endure. So to prevent permanent wear patterns, these grit and dirt should be removed periodically –and professional washing every 6 months is recommended. 

How Often Should Your Rugs Be Cleaned?

Rugs are often one of the first things people notice in our homes and can be a significant investment. Everyone enjoys a soft plush carpet and rugs can be wonderful for a home’s aesthetic appeal. However, regular cleaning and deep cleaning is required to maintain a fresh and cleaning looking rug and to extend its lifetime.

Springtime is generally considered a great time for rug cleaning, especially if you live in a place with heavy winters where snow and dirt might get tracked in. However, the frequency and timing of your rug cleaning also depend on where you stay and your lifestyle. While an annual cleaning is definitely recommended, a professional rug cleaner could help you determine if you might need more frequent rug cleaning,

Certain factors that could determine the frequency of rug cleaning are:

Small Children

Anyone who’s ever lived with small children knows they can create quite a mess. From food crumbs to toys and playing clay, there are ample ways that they can create a mess. Also, it is important to have a clean home for the health and wellbeing for your children.

Pets

A home with pets can always do with some deep cleaning. Pets tend to shed hair as well as can have toilet-related accidents making regularly scheduled rug cleaning important.

Allergies

If any member of your family is allergy-prone you do understand the importance of a regular deep clean. A regular rug clean gets rid of dust mites, dirt and any other allergens which could adversely affect your health.

A regular carpet deep clean is not only helpful in keeping your rugs looking clean and fresh but is also important for the health and wellbeing of your family. Instead of planning to get your rugs cleaned only once a year, plan to keep your favorite investment pieces clean and new-looking for as long as possible.

The Benefits of Regular Rug Cleanings

Many people find that getting their rugs deep cleaned on a regular basis is beneficial for their home, health, and peace of mind. Even if you’re generally pretty tidy, you might be surprised at the difference a professional cleaning can make.

The main benefits are:

  • A longer-lasting rug. No matter what material they’re made of, clean, well-cared-for rugs last longer.
  • A fresher smelling home. A clean rug doesn’t smell like anything, but a dirty one can stink up the whole house over time.
  • A more beautiful rug. You’d be amazed at the difference we see in many of the rugs we clean at our Portland facility. Many people don’t even know how dirty their rug is until they see it clean!
  • A healthier environment. Allergens, microorganisms, and bacteria live in dirty rugs. A good professional cleaning can remove them, contributing to a more hygienic home.
  • Less stress. Are you the kind of person who gets stressed out when you’re stuck in a cluttered or unclean environment? Do yourself a favor and get those rugs freshened up.

How Professional Rug Cleaning Works

No two rugs are alike. A very sturdy, very dirty rug needs to be treated differently than an extremely delicate rug that’s only a little bit dirty. That’s why we carefully inspect and hand wash every rug that’s brought to our facility here in Portland. High-quality rug cleaning is a multi-step process:

Pre-Cleaning Inspection: We closely examine your rug to identify stains, odors, heavy traffic areas, and the specific dyes and fibers your rug is made of. We also see if there’s damage that needs repair or any other special issues. Then we give you an exact quote for the cleaning.

Dust Removal: Dust can really settle into a rug over time. Often you can’t even see it! We thoroughly dust your rug to remove dust, dirt, and other sediments that regular vacuuming and cleaning products can’t.

Washing: We create a customized cleaning formula for each rug, taking special precautions to protect your rug’s delicate fibers and avoid dye bleeding and dye transfer problems. We do this for two reasons:

Acustomized formula can target specific types of soiling, stains, microorganisms, and odors.

Different rug fibers (like synthetics and wool) need to be cleaned differently. We know how to get your rug clean without damaging it.

Pet Urine Removal: Pet urine accidents happen, but they don’t have to ruin your rug! For badly saturated rugs, we submerge your rug in our enzyme pond to remove stains and neutralize odors. An enzyme spot treatment may work just as well for small stains. Learn more about urine removal.

Drying: Our environmentally controlled drying room keeps your rug safe and uncontaminated as it dries naturally. Controlled drying is especially important for rugs with odor issues or fast-moving dye sets.

Post-Cleaning Inspection: We do another inspection after the cleaning process to ensure that we send you home with a beautiful, clean rug you’ll be proud to display in your home.

Now you know how the cleaning process works, and you know that most rugs should be cleaned about every 12-18 months, but it’s more complicated than that. Let’s look at what types of rugs need to be cleaned more or less often than the traditional 12-18 months.

What Tips Should You Keep In Mind When Hiring A Carpet Flooring Cleaner

Does carpet suit your room and lifestyle?

Carpet acts as a trap for allergens and is capable of holding significant quantities of soil, dust and other substances. The carpet holds on to the particles until you are ready to remove them.

Carpet is ideal for cushioning our footsteps. Carpet provides safety protection for the whole family, but especially for toddlers and older individuals. It is also warm under foot.

Carpet will reduce noise generation in two ways – at floor level by cushioning objects hitting the floor, for example footsteps or dropped items, and by absorbing other sounds around your home creating a more peaceful indoor environment.

Easy to maintain. A good vacuum cleaner, a periodic wet clean and prompt attention to spills is all you need to keep your carpet looking good. Professional carpet cleaning is recommended every 12-18 months to keep your carpet looking new and to satisfy supplier warranties.

Which carpet fiber will work best for you?

It is important to choose a carpet fiber that will work best for the space in your home. There are four synthetic types of fiber. Each fiber type offers somewhat different attributes of style options, colour options, soil resistance, stain resistance and texture retention

Nylon – The most popular carpet fiber as it performs extremely well. It is one of the more expensive fibers available. Nylon 6.6 Fiber is a more premium type of nylon fiber than “Type 6” nylon that’s also used in a lot of rugs. It has greater strength and resiliency which adds to the product’s overall durability. Though not inherently stain resistant, most nylon carpets feature a stain-resist carpet treatment for protection against household spills and stains.

Polyester (PET) –  is naturally stain and fade resistant. Is best at retaining colour and won’t fade over time. It’s also capable of providing a very soft feel though it’s not as resilient as nylon and is more prone to compaction. Best uses for Polyester styles are low to medium traffic rooms such as bedrooms.

Polypropylene (also called Olefin) – is a relatively inexpensive fiber. Its strengths include superior stain resistance, with the exception of oil-based stains, and low cost. It is a solution-dyed product, which means colour is added during extrusion in its molten state rather than topically applied. (Imagine a carrot vs. a radish). Because of this dye method it has superior resistance to bleaches and sunlight fading. However it has poor resiliency, which can lead to crushing. Polypropylene’s provide an excellent value and good performance.

Wool – remains the premier fiber in carpet construction and it can be expensive. It has excellent resilience and durability. Wool cleans especially well. Unfortunately, wool tends to “wear down” or the pile tends to wear away. In some cases bald spots may occur as a result heavy traffic loads. Wool is a natural fiber with a natural protective membrane which acts to repel moisture and is a natural stain resister. Because it can absorb a large quantity of moisture without feeling wet, wool carpet doesn’t conduct static electricity in the way synthetic carpets do. Less static means less dirt.

A word about soft carpets.

Demand continues to grow for carpets with a very soft feel, often referred to as “soft carpets”. All major carpet brands provide a good selection of soft carpet styles.

Note that as some soft carpets are so soft, that the total surface density is much higher which in turn increases the suction between vacuum cleaner head and the carpet surface, thereby making it more difficult to maneuver the machine. Some soft carpets require a gentler cleaning action so as to avoid unnecessary wear and will require a special vacuum cleaner.

Which Types Of Flooring Are Best For Cold Weather Climates?

In colder climates, many types of flooring will always give you cold feet. For cold climate homes or winter homes, you’ll want to choose flooring materials that will keep you and your guests cozy.

Carpet

This flooring type is the most obvious choice for cold homes. It’s also the cheapest. As you know, carpet is like a warm, cozy blanket between your delicate tootsies and your unforgiving cold floors. It’s a no-brainer for cold homes.

However, there are some drawbacks you may not have considered. For one thing, carpets are the most difficult flooring type to clean when it comes to tracked-in snow and muddy messes. For two, fluffy carpets + cold, dry weather = electric charges. In other words, carpeted flooring is notorious for causing wintertime static shock. This may be fun for your kids, but not so much for your grown-up party guests.

Tile

Now, this flooring choice is the opposite of carpet. That is, it’s the least obvious choice, and more expensive. Because tile is an excellent conductor of heat (and therefore, cold), it can easily get as cold as the snow on your porch. But, for this same reason, you can optimize it for cold climate. Tile is the best choice as a covering for artificially heated floors.

Vinyl Plank Flooring

Now here’s a healthy compromise between the two options above. Vinyl plank flooring gives you the best benefits of almost every flooring type. It looks like a hardwood floor, insulates almost as well as carpet, and is as water-resistant and easy to clean as tile. And it’s one of the cheapest flooring options available.

Carpet – Before Installation

What to know and do before your carpet is installed.

You’ve learned all there is to know about carpet, shopped smart, made your best choice, and now it’s just a matter of waiting for the installers, right? You know better, of course. The next step is to be knowledgeable and prepared for the big day when the new carpeting will transform your home.

OUR BEST ADVICE IS TO GO WITH THE PROS.

Carpet installation is a skill that is developed through years of experience, so using professional installers is just plain smart. Also, understanding the basics of carpet installation will increase your knowledge of the process and enhance your confidence in the professionals working in your home. Some of these basics follow.

THE SEAMING DIAGRAM IS THE INSTALLERS’ “BLUEPRINT”.

This shows the overall layout of the carpet, the correct placement of seams and transitions, and assists them in the preparation and cutting of the carpet.

NOBODY KNOWS HOW TO DEAL WITH SEAMS BETTER THAN THE PROFESSIONALS.

While seams are inevitable, it’s the professionals who excel at minimizing and hiding seams. They call on years of experience and tried and true methods. Case in point: they’ll insure seams are placed away from areas subjected to pivoting traffic, and not run seams perpendicular to doorway openings.

The pros know what to do about transitions. When two different flooring products meet – say, carpeting and a hardwood floor – it’s called a transition. Your professional installers will try to match the surface heights of various flooring products to minimize transitions.

Flooring specialists

Versatililty

We have the perfect floor for you. Whether you desire hardwood, vinyl, laminate, ceramic, or carpet we have the floor for you.

Affordable

We will always be competitive in pricing with our competitors. We believe in taking care of our customers. Product for product we usually win in pricing.

Selection

We do a lot of business with all the major manufacturers and many of the smaller ones as well. Whatever you’re looking for we probably have it.

Guarantee

All of our installs are guaranteed for 12 months. We always takes extreme care so you can rest assured when we install your new floors.

When it comes to flooring, we know our stuff. We are one of the highest rated flooring installers and for good reason.

Vacuum Cleaning Tips for Your Floors

There are several helpful and easy cleaning solutions to keep your house free of dust, germs and microscopic mites. While disinfecting the counter-tops and picking up the clutter helps, today we are going to focus on how to keep your floors clean with a vacuum cleaner.

The vacuum is one of the most valuable tools a homeowner can own to help keep their floors clean. There are many different types of vacuum cleaners available on the market, all with their own set of pros and cons. So if you need a vacuum cleaner, then it would behoove you to do the proper research and start cleaning.

Don’t Make It Harder

The first vacuum cleaning tips is probably the most obvious — don’t make it harder than it should be. You’d be surprised at how many people inadvertently create additional messes that make vacuuming more difficult than it should be.

Once is Not Enough

To truly pull up the dust and hair on your floor, it is usually better to vacuum multiple times in the same area. On top of this, it would also be wise to go over the areas from multiple directions, as this will help pull up dirt and debris more effectively.

Create a Schedule

Another important cleaning tip when vacuuming your home is to create a schedule. Whether you pick a certain day of the week or month, following a regular schedule and sticking to that routine will help ensure that your floors are clean at all time.

Laminate Flooring And What You Need to Know

The secret on how to lay laminate floors quick and easy

we need to share this progressive item gliding laminate wood floors. Laying laminate floors would be an awesome choice for you to run with, in the event that you need to spare a buck like we as a whole do in this season of retreat. Day! It’s extremely straightforward from the principal board you cut together. Not to stress, We here to enable you in adapting all you to need to know.

With regards to looking incredible, straightforward establishment, on a financial plan yet at the same time solid. Nothing approaches laminate flooring. All that you requirement for introducing your laminate flooring dependably accompanies simple to take after directions on the container it will make your work a breeze. Gliding laminate floors are not appended to your current floor with the goal that why I mean by is fast and simple.   It’s straightforward laminate floors clasp and bolts together upon connection. How simple is that. Envision no paste or nails, to introduce this kind of floor. Amazing, you can really confine it for any reason, so in the event that you move your floors can accompany you. How cool is that. Let’s say you need to offer you laminate floor. You could do as such and profit back in addition to an introducing charge, on the grounds that after you take in the data you assemble from this site, you will be a pro.

The mystery behind glue less laminate flooring is each board cutting Bodenlegen Laminat Duisburg. It’s a basic locking framework that can enable you to fit each piece effortlessly. No all the more reasoning like the past. This is what is to come! Consider it along these lines. Presently a day you can have it done in the event that you can take in specific tips and traps. Time to prepare began!

Before you lay anything down on your solid floor. Make a point to clear the floor for rocks or whatever else from the floor. There are a few assortments of these liners you can browse to pick the best that suits your sub-floor. Laminate floors have a substantial determination of that may have worked in under liner. It’s still best prescribed to apply this clammy confirmation laminate underlayment to your solid floors. Protection is another idea you should put into thought. For engrossing commotion and keeping dampness out is a piece of these laminate underlayment’s obligations. There are distinctive kinds of commotion diminishment cover as well.

Mind the Gap

Prior to installation, it is important to remove the baseboards on the walls of the room where you are installing your laminate floor.  Laminate installation instructions always include “Be sure there is a 1/4″ gap between the laminate planks, the walls and any transitions.”  This space will easily be covered by the room’s baseboards once you re-install them.  This simple process is vital to the health and longevity of your laminate floors.  Like all wood products, laminate expands and contracts with changes in temperature and humidity.  When the laminate expands, this small space allows it to do so without buckling.  Using a 1/4 inch wide shim to verify your spacing around walls and between transitions will keep your floors looking great for years to come.

Make Smart Transition Choices

It doesn’t matter how thick your laminate is, even the thickest laminate has limits to how much square footage it can cover before its structural integrity is compromised. In order to ensure the strength of your laminate floor, it is best to install a transition at the threshold of every room.  Transitions are spaces where molding is installed to break up the laminate flow.  With a 1/4 inch space on either side of the transition space, your floor is able to expand at a variety of conditions.  This is especially important in multi-room installations as the varying environmental conditions between rooms can wreak havoc on the flooring.  For instance, for laminate installed in a dining room and kitchen, a transition piece in the doorway between the two rooms will allow the flooring in the kitchen, where temperature varies wildly, to expand at a different time and different rate than the flooring in the dining room, where the temperature remains more constant.  Transitions from laminate to tile, from laminate to carpet, and from laminate to laminate are available to ensure your floor looks finished and beautiful.

Installing your laminate floor is a fast, easy process provided you remember these two simple tips.  By minding the gap around walls and transitions and ensuring your transitions are appropriately placed, your laminate will give your home a modern flair and will last for years to come.

Install the First Row of Flooring

Before installing the floor, it’s important first to calculate the width of the flooring planks in the very first row and in the very last row. That’s necessary for a couple of reasons: First, the floor will look much better—and more balanced—when the first and last rows are approximately the same width. And more importantly, it’s critical that neither row be less than half the width of one full plank. Here’s how to do the necessary calculations:

Measure the width of the room and subtract 3/4 inch for the expansion space (3/8-inch gap along each wall). Then divide by the room width by the width of one plank. That’ll give you the number of full-width planks needed to cover the floor, plus the fractional width of any remaining plank. If the remaining width is less than half a plank, you must use a table saw or circular saw to rip down the flooring in the first row so that the last row will be at least half a plank wide. Sound confusing? It isn’t really. Here’s an example:

Let’s say the room is 123 inches wide, and the plastic-laminate planks are 7½ inches wide. Subtract 3/4 inch from 123, then divide by 7½ to get 16.3. That reveals that you’ll need 16 full planks to cover the room, plus 3/10ths of a plank. So, if you start the first row with full planks, the last row would be only 2-1/4 inches wide, which is 3/10ths of a plank. In this case, it would be necessary to rip 2 5/8 inches off the first row so that the first and last rows would each be 4 7/8 inches wide. Get it?

When setting down the first row of planks, be sure the edge with the tongue faces the wall, and the grooved edge faces out into the room.

How to end flooring at a doorway

Often, there’s no avoiding ending up at a doorway. When that happens, it’s a bit tricky because you have to slide the flooring under both jambs. Here’s how to handle it with just a little bit of trim carpentry.

1. Lift to fit:

Plan on a seam in the middle of the doorway. Notch and cut the first piece to fit and then slide it completely under the jamb. Notch the second piece so it’ll be just short of the door stop when it’s in place. Lift the flooring to get it around the corner and under the casing, then snap it in.

2. Slide both pieces over:

Once the two pieces are connected, slide them both over just far enough so that both jambs cover the flooring ends.

In your home

When you lay laminate flooring in your home, it’s important to consider whether your flooring is suitable for that particular room. As you can see from the room suitability chart above, laminate flooring can be installed in most areas within your home. However, rooms with high levels of moisture require extra caution and thought. While laminate is water resistant, it isn’t waterproof. In areas such as kitchens and bathrooms, large spillages and prolonged exposure to moisture causes lasting damage to your flooring.

Although it’s not advised, if you are fitting laminate flooring in either of these two areas, ensure you clean up any spills as quickly as possible. Laminate is also compatible with underfloor heating. As long as the temperature doesn’t exceed 27°C, it’s able to handle the heat without damage. For high-traffic rooms that may see a lot of people coming and going, such as hallways and living areas, laminate’s durability makes it the perfect choice. Its HDF (high-density fibreboard) core, as well as a scratch-proof protective wear layer, gives it added strength.

How To Lay Laminate Flooring

Laminate Installation Tips

Step By Step Instructions:

Preparation

48 hours before installation place the flooring in the room to be installed and horizontally score the unopened packages. Once packages are open, planks should be installed immediately. Check all planks to be installed. Claims for defective planks that have been installed cannot be considered.

Installation

Planks can be installed over concrete, vinyl, linoleum, wood, ceramic tile, marble or stone. Existing carpet should be removed.

  1. Clean the sub floor and make sure that it is level and dry. The sub floor cannot vary more than 3/16″ in 8′; moisture content of the wood sub floor should be no more than 10%, with a maximum of 5 lbs. vapor emissions for concrete sub floors.
  2. Concrete sub floors must be covered with 6 mil polyethylene film. New concrete must be cured for at least 6 weeks before installation. Existing concrete with flooring already installed such as vinyl or ceramic must be covered with 6 mil polyethylene film. Overlap seams by 8″. Seams do not have to be taped.
  3. Do not use polyethylene film over wood sub floors.
  4. Remove all existing trims and wall base as necessary.
  5. To ensure that your first and last row of planks is of equal width, measure the width of the room and divide the width of the room by the width of the plank. If the width of the last row of planks will be less than 21/2″ cut the first row of planks to make it narrower to achieve an approximate equal width in the first and last rows.
  6. If possible, install planks with the long direction parallel to the incoming sunlight source or to the longest wall of the room.
  7. Leave a minimum 1/8″ expansion area around walls and obstacles in the floor.
  8. Begin installation at the left-hand corner. Place the first plank with the tongue side towards the wall, being sure to allow 1/8″ for expansion. We recommend cutting off the tongue on this first row to avoid any problem with the expansion gap. Insert the second plank into the first at an angle pressing the short ends together; then press it down. Repeat the same procedure down the row. Measure and cut the last plank of the row (decorative side up if using a hand saw, decorative side down if using and electric saw). Set the remaining piece aside.
  9. To start the second row, use the piece left over from the last plank of the first row. If it is too short, cut a new plank in half and use one half to start the second row. Insert the first plank of the second row at an angle into the first row; press in and down at the same time until the plank locks in place. Repeat this step with the next piece, keeping the short joints of these two pieces as close to each other as possible without actually engaging them. Using a tapping block, tap the second piece into the first. Continue installation in this manner. From the second row onward use a pull bar to engage the short edge of the last plank.

My Laminate Flooring Won’t Lock

A Few Possible Problems

Some common reasons why laminate pieces won’t snap into each other include:

  • A warped or flawed piece of laminate
  • A heaved or uneven subfloor
  • A piece of debris trapped under the flooring or underlayment, or in the flooring’s grooves
  • A protruding nail or screw head

To troubleshoot, start by holding the plank up at eye level to see if it is warped. If not, examine it for manufacturing flaws or debris in the grooves. If there’s debris you can brush it out, or if there’s a defect you can trim the plank to remove the affected section.

If the problem isn’t with the plank itself, problem, look at the floor underneath your work area. If nails or screw heads prove to be the culprit, lift the underlay and drive them all so they’re flush or countersunk. If there’s debris beneath the underlayment, pick it up manually or sweep it up before replacing the underlayment.

Tongue or Groove? Which to Install First

Which side is the tongue, which the groove, and which goes first during installation?The tongue is the side that you will want to place against the wall as you start your laminate-flooring installation. If you mix the two up and start with the groove side, you will have difficulty completing the installation because you will essentially be installing the flooring backwards.In the line drawing above, note the orientation for the tongue and the groove. As this illustration indicates, the tongue for any Swiss Krono click system protrudes outward, while the groove part forms a cavity for the tongue of the next plank to fit into. Both are cut to micron precision so that they create a snug, interlocking installation.You will want to start in the left side of the wall you pick with the tongue on the long side of a plank facing the wall. The tongue against the wall should be removed. You can use a sharp utility knife for the 7-mm or 8-mm product, but 10-mm or 12-mm product will require a saw.It is important to work from left to right to avoid damaging the tongues on the short side of the boards.Before getting started with your installation project, and after you have acclimated your laminate flooring planks, it’s a good idea to get all of your planks oriented in the same direction with the tongue side of each plank parallel to the wall you will be installing against.

How can I fix open joints in my laminate flooring?

Humidity can make your laminate floor boards shrink or expand a bit. This fluctuation in humidity levels can cause them to click loose and move, resulting in openings between the boards. Fortunately, you don’t have to remove the entire floor to close these open joints. Using the following step-by-step guide, you can easily fix the problem.

Before you get started, you’ll need a few tools: a hammer, a chisel, a crowbar and a tapping block. Optional: wood glue.

  • Take a close look at the open joint and try to determine in which direction the board moved. This is the side where you’ll remove the skirting board.
  • Use the chisel and hammer to remove the skirting board on the side the laminate board moved towards.
  • Once you’ve removed the baseboard, you’ll see which board came undone. Using the hammer and tapping block, knock the board back in place to close the open juncture. You can use some wood glue in the crack between both boards to make sure it won’t come apart again.
  • Glue your skirting board back together and your laminate floor is perfect again.

The Best Way to Cut Laminate Flooring – Step by Step

This quick guide covers all the laminate flooring cuts you’ll need to make. If it seems quite easy, be sure that it is with a little practice. You may make a false cut or two, but those pieces can be salvaged for later when a shorter piece is required.

Cutting laminate to length:

  • Measure the length required using your tape measure
  • Mark the board for the cut
  • Use your square and pen or pencil to create a straight line across the face of the board
  • Use your cutting tool to make the cut on the waste-side of the line, and use a damp cloth to remove any remaining ink

Cutting laminate to width:

Cutting to width is required for the last board to install before an obstacle such as a wall, cabinetry or fireplace. Keep in mind that laminate flooring requires an expansion space of about 1/4″ to keep the flooring from buckling when it swells slightly with warmth and humidity. The gap will be covered by the baseboard.

  • Lay a full piece of laminate on top of the second-to-last piece, snug it against the wall, and measure the amount of overlap
  • Cut a guide out of laminate scrap that is as wide as the overlap plus 1/4″ to mark how much of the laminate must be removed
  • With the piece still against the wall, place the guide you’ve made on top of it, also against the wall
  • Run the guide down the length of the board, holding your pen at the base of the outside of it to mark the last piece for cutting
  • Cut the piece on the waste side of the line, and use a damp cloth to remove any remaining ink

Cutting laminate around pipes and other obstacles:

  • For pipes, measure the length and width to the center of the pipe
  • Make a mark on the laminate piece where the center of the piece would be
  • Use a hole saw about 1/2″ in diameter larger than the pipe diameter to create an opening for the pipe
  • Cut the laminate piece in half across its width through the center of the hole
  • Fit the pieces around the pipe, and use glue suitable for laminate to attach the pieces together
  • For cutting around odd-shaped obstacles, use the profile gauge to replicate the profile of the obstacle
  • Lay the profile gauge onto the piece of laminate, and trace the profile onto it with your pen
  • Use the jigsaw to cut out the profile, cutting on the waste side of the line

Advantages And Applications Of Epoxy Flooring In An Industrial Set Up

How to Choose the Best Epoxy Floor Coating

A true epoxy is always a two-part product that is used by mixing a resin and hardener/activator. Epoxies do not “dry” in the same way that paints dry—through simple evaporation of water or oil-based solvent. Instead, they cure and harden through a chemical reaction between the two components.

Two-Part Epoxy Floor Coating With 100 Percent Solids

Two-part epoxy floor coatings are described as “100 percent solids” because they do not contain any traditional solvents. Two-part epoxy coatings offer the very best surface for concrete, a thick, hard, and attractive finish. These epoxy kits are often used with decorative chips that are sprinkled over the surface while it is hardening to provide a texture and attractive finish. The surface will be fully hard fairly quickly, within about 24 hours of application.

True 100-percent-solids epoxy is also the most expensive option, and it is a bit more demanding to install when compared to other types of coatings. These products emit intense fumes when applied, requiring thorough ventilation. But installing 100 percent epoxy floor coating can be done by DIYers. You can buy a kit for a one-car garage for $250 to $300, which includes application tools. EpoxyMaster, which is available from Costco or online retailers, maybe the easiest product to find.

Two-Part Water-Based Epoxy Floor Coating

Quikrete, and Rust-Oleum (EpoxyShield) offer popular DIY two-part epoxy floor coatings that are readily available at many home improvement, paint, and hardware stores. These are hybrid products that have the components of genuine epoxy (resin plus hardener/activator), but they also include water as a solvent. You can identify these products because they consist of two parts that are mixed together, but are cleaned up (when wet) with soap and water. They may also be advertised as “low VOC” or “low odor,” a striking difference to true epoxies, where thorough ventilation is critical.

One-Part Floor Coating

A true epoxy floor coating is always a two-part product containing resins plus hardener/activator. Just before application, the resin is mixed with the hardener. A floor coating product that is called “epoxy” but which is sold premixed in a single container is not true epoxy, but rather should be viewed as a form of paint. While the formulation may offer better performance on a floor than standard paint, these are not true epoxy products.

How Do I Know Which Type of Epoxy Flooring Is Best For My Floor?

This is a question many customers ask us along with why is your epoxy better and what does it cost. The following information will answer those questions and help you make the right purchase for your particular floor application. There are different types of flooring you can use in addition to an epoxy coating such as Interlocking Tiles or Rubber Garage Floor Mats. There’s a good discussion here Epoxy vs Tile vs Mats about the pros and cons of each of these different products you can use.

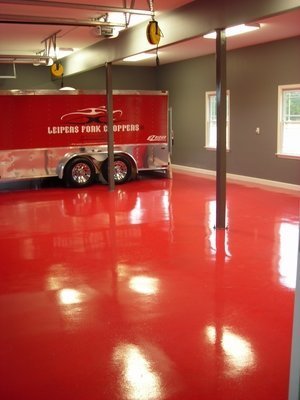
But if you’ve set your heart on a super high gloss epoxy floor coating then stay on this page and we’ll tell you everything you need to know. From being one of the largest epoxy installers in the Tri State area we’ve learned over the years exactly what works and what doesn’t. There’s so many choices today it can be down right confusing and frustrating not to mention easy to make a mistake. The problem is that a lot of the products you’ll see don’t live up to their marketing in real life. They’ll state they are heavy duty, commercial or industrial grade floor coatings and will last a lifetime when they’re no such thing nor capable of any such thing. Know the facts before you buy! If you think you can get a floor that looks like the beautiful red floor above by just going down to your local store or ordering some epoxy online without knowing what you’re buying, you couldn’t be more wrong!

Picking the right epoxy floor coating is a four step process with certain questions you have to answer:

The cost of applying a high quality multi layer epoxy floor coating system as compared to off the shelf water based or hybrid one coat type epoxies can be relatively much more expensive.

So do you need a quality epoxy coating or is a cheap epoxy paint good enough for your floor?

What type of look and finish do you want. Solid color, clear finish or colored flake finish?

What level of durability do you want and or need. Is your floor an industrial application or residential application or somewhere in between? And how do you know an epoxy is really industrial or commercial grade? Many epoxies call themselves industrial or commercial grade until they’re on your floor and you wear right through them. At that point the damage is done, this page will hopefully help you avoid being in that situation.

What condition is your concrete floor in? Is it new, is it old, is it pitted, is it oil stained, does it have a moisture issue? Your floor may need special attention to avoid a failure down the road.

These are some of the questions we will answer in the discussion below. Not addressing these questions prior to your purchase is a more likely than not going to lead to disappointing results.

The first thing you need to determine is what kind of finish you want/need and what your budget is. Whether your coating an industrial floor or just your garage floor or something in between. If your budget won’t allow you to use an epoxy coating system that is equal to or greater than the traffic loads you will run on the floor, then our best advice is don’t epoxy paint your floor. You’re better off going to your local home improvement store and purchasing a sealer and simply sealing the slab to protect against corrosion and to make it easier to clean.

The cost of a multi layered high strength epoxy floor coating you do yourself will average about

$1.00 – $1.75 per square foot depending on size and type of floor and the type of epoxy system used. Compared to an average price of $4.00 – $8.00 per sf to have a company come in and do it for you. By the way all costs for epoxy flooring should be based on a per square foot basis. Anybody quoting you prices based on any other parameter is just selling you marketing hype.

HOW TO CHOOSE AN EPOXY FLOORING CONTRACTOR GUIDE

Finding the Best Epoxy Flooring Contractor

Our Epoxy Flooring Contractor Guide is essential when you’re looking to hire the best contractor for your epoxy floor coating project. An important investment as such requires up-front research. The growing trend of decorative floor coatings has given rise to the number of flooring contractors that perform this intricate service. However, many new companies do not have the education and experience that comes from longevity in the business. After 30 years in the concrete flooring industry, Creative Maintenance Solutions has a consistent, proven record of success. We want to pass our knowledge on to you to help you make an informed selection. Let us walk you through our “How to Choose Right Epoxy Flooring Contractor Guide.”

What Makes a Reputable Contractor?

Before we delve into our checklist, we want you to understand the characteristics of a reputable epoxy flooring contractor. Trustworthy concrete flooring professionals walk you through the entire process. They explain the difference in materials, including the chemical makeup and reaction, quality, and cost of each option. They describe the detailed application process from surface preparation to curing time. Efficient epoxy experts educate you about after-care and long-term concrete flooring maintenance.

Are you licensed and insured?

Whether you are considering a sole-proprietor or an entire firm, your contractor must have insurance. A general liability policy protects you and them, covering property damage, accidents, disasters, and bodily injury. Inquire about additional coverage such as installation and equipment policies. Request proof of insurance. Once you have this, if you still have questions or concerns, reach out to the insurance company or agent. Solicit information regarding claim limits, policy expiration, and how to file a claim.

How much professional experience do you have?

The internet and reality do-it-yourself shows make flooring projects look less complicated than they are. When you’re investing in new flooring, it is best to hire a qualified professional. Epoxy floor coatings involve a complex combination of chemicals, environmental factors, and problems that occur. It is an exact science. The more knowledge acquired by flooring installers, the smoother your project will go. Time spent on a project, troubleshooting, and quality of service by a competent contractor surpasses that of inexperienced workers.

What do your references and reviews say?

Online reviews and ratings give consumers a unique view of businesses. We have access to complaints, concerns, and compliments that were once only heard by the establishment. Keep in mind that not all reviews are positive. Also, not all reviews are complimentary. Weigh the positive and negative and watch to see how the company reacted

Tips for Choosing the Right Epoxy Floor for Your Project

Deciding to install an epoxy floor in your home or business is a big investment. You want to be sure you choose the right finish and color, helping to give you a great-looking space that’s also easy to maintain.

Think of Your Needs

If you’re putting a new epoxy flooring finish in your sleek office building, for example, choosing a big, bold color with a shiny metallic finish might not give off the impression you’re going for.

Choose Your Finish

At Armor Tough Coatings, we offer two types of epoxy floor finishes: Metallic and standard, or matte.

Choosing a Color

Color can make or break the look of your finished epoxy floor. If you choose the wrong color for your room, like choosing the wrong carpeting, it could impact the look and feel of the space. However, the right epoxy floor in the right color can elevate a space to give it a sleek, modern feel.

Epoxy floors are available in a variety of colors and many installers can custom-mix colors to give you exactly the look you want. When choosing the color of your floor, first decide whether you want something bright and bold or a more neutral color.

How do you choose the best epoxy floor coating?

The cost of applying a high quality multi layer epoxy floor coating system as compared to off the shelf water based or hybrid one coat type epoxies can be relatively much more do you need a quality epoxy coating or is a cheap epoxy paint good enough for your floor?

What type of look and finish do you want. Solid color, clear finish or colored flake finish?

What level of durability do you want and or need. Is your floor an industrial application or residential application or somewhere in between? And how do you know an epoxy is really industrial or commercial grade? Many epoxies call themselves industrial or commercial grade until they’re on your floor and you wear right through them. At that point the damage is done, this page will hopefully help you avoid being in that situation.

What condition is your concrete floor in? Is it new, is it old, is it pitted, is it oil stained, does it have a moisture issue? Your floor may need special attention to avoid a failure down the road.